


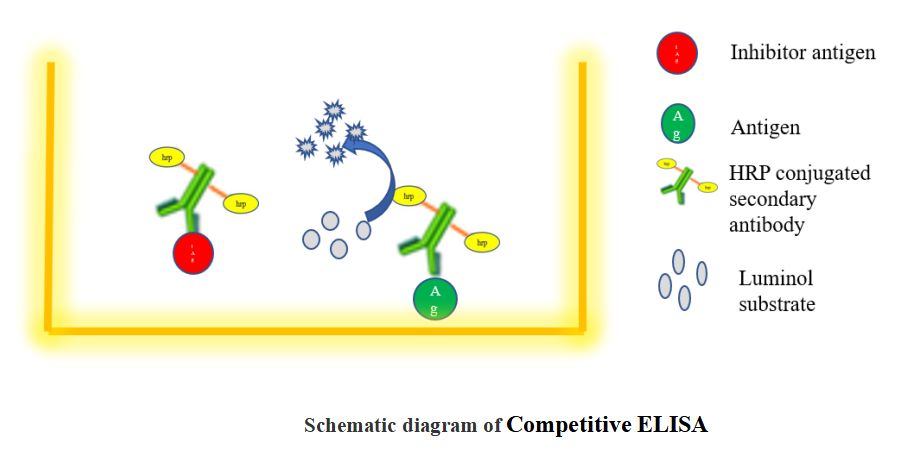
What is Competitive ELISA
The steps of a competitive ELISA are different from those used in indirect and sandwich ELISA, with the main difference being the competitive binding step between the sample antigen and the "add-in" antigen.
The sample antigen is incubated with the unlabeled primary antibody. These antibody-antigen complexes are then added to the ELISA plate, which has been pre-coated with the same antigen. After an incubation period, any unbound antibody is washed away. There is an inverse correlation between the amount of free antibody available to bind the antigen in the well and the amount of antigen in the original sample.
For example, a sample with abundant antigen would have more antigen-primary antibody complexes, leaving little unbound antibody to bind to the ELISA plate. An enzyme-conjugated secondary antibody specific to the primary antibody is then added to the wells, followed by the substrate.
Coating antigen to the microplate
-
1. Coat the wells of a 96-well ELISA plate with 100 μL of purified antigen at a concentration of 1-10 μg/mL.
-
2. Cover plate with an adhesive plate cover and incubate the plate overnight at 4°C.
-
3. Following incubation, remove the unbound antigen solution from the wells by flicking the plate over a sink.
Blocking
-
4. Block the remaining protein-binding sites in the coated wells by adding 200 μL of blocking buffer to each well, which can be either 5% non-fat dry milk or 1% BSA in PBS.
-
5. Incubate the plate for 1 h at at 37°C.
Incubation sample (antigen) with the primary antibody
-
6. While blocking the wells, prepare the antigen-antibody mixture by mixing 150 μL sample antigen and 150 μL of primary antibody for each well in the assay.
-
7. Incubate this mixture for 1 h at 37°C.
Add antigen-antibody mixture to the well
-
8. Now, remove the blocking buffer from the wells by flicking the plate over a sink.
-
9. Then, wash the wells with 1X PBS containing 0.5% Tween-20 (wash buffer).
-
10. Add 100 μL of the sample antigen-primary antibody mixture.
-
11. Incubate the plate at 37°C for 1 h.
-
12. Remove the sample mixture by flicking the plate over a sink.
-
13. Then, wash the wells with wash buffer to remove any unbound antibody.
Add the secondary antibody
-
14. Add 100 μL of an enzyme conjugated secondary antibody, which in this case is HRP-conjugated antibody, to each well.
-
15. Incubate the plate for 1 h at 37°C.
-
16. Following incubation, wash the plate with wash buffer.
Detection
-
17. Add 100 μL of the substrate solution (TMB) to each well.
-
18. Wait for 5-10 min.
-
19. After the colour development, stop the enzymatic reaction by adding 100 μL 1M sulfuric acid to the wells. Then, measure the absorbance in a microplate reader within 30 min of adding the stop solution
 Guidence of GeneMedi's protocol / procedure for the diagnostics application: