


GeneMedi's protocol / procedure for the diagnostics application-IHC
1 Immunohistochemistry
-
Immunohistochemistry (IHC) is a mainstay immunoassay for many laboratories and is used to demonstrate the presence or absence of important proteins, detect post-translational modifications, diagnose disease, and more.
-
IHC uses both immunological and biochemical techniques to examine distinct tissue sections by the use of labeled antibodies interacting with target antigens. A visible label or stain is used to visualize the antibody antigen interaction.
-
IHC allows for the visualization of distinctive cellular components of cells and is frequently used by pathologists and in diagnostics. The antibody-antigen binding can be visualized in different manners such as immunofluorescence (IF), Enzymatic and Affinity.
-
IHC is widely used in many research and clinical laboratories because this technique makes it possible to visualize the distribution and localization of specific cellular components within cells and in proper tissue context. There are numerous IHC methods that can be used to localize antigens. The method selected should include consideration of parameters such as the specimen types and assay sensitivity.
1.1 Sample Preparation
Sample collection and preparation play an important role in IHC as the antigen exhibition and location are largely depend on the quality of cell or tissue sample.
Cell Sample:
(1) Adherent Cells
-
- Cell Climbing: Grow adherent cells on multi-aperture culture plates with coverslip, culture vessels or chamber slide
-
- Direct Cell Culture : Culture adherent cells directly on culture vessels or multi-aperture culture plates
(2) Non-Adherent Cells
-
- Cell Smear : Adhere non-adherent cells on coverslip with chemical bond
-
- Eccentric Cell Smears : Adhere non-adherent cells on culture vessels by cell micro-centrifuge
Tissue Sample
Tissue samples are typically taken from specimens of various sources: biopsy, surgery, animal model and autopsy. The first three types of specimens give fresh tissues while the last one (autopsy) is taken after an animal has died for two hours which is more or less a postmortem autolysis. As antigens may denature, disappear and diffuse, autopsy specimen should be fixated as soon as possible so as not to influence its label.
1.2 Fixation
Importance of fixation
-
- Keep cell sharp and tissue shape to prevent postmortem autolysis, putridness, endogenic and exogenic enzyme activity
-
- Maintain cell structure and position by preventing antigen diffusion through transfer of protein, fat, sugar and enzymes of cell into insoluble substances
-
- Precipitate and curdle materials in tissue to produce different refraction
-
- Indurate tissues to enhance working with glass slides
-
- Prevent cell from shrinking and swelling
-
- Give color to clarify tissues by different affinity to coloring agent
- Selection of fixing solution
Acetone and Alcohol
These two types of solutions, which are primary fixing solutions, play a role of precipitating sugars and fat as well as maintain the immunologic competence.
Aldehyde
It is a functional cross-linking agent which is widely used due to its span penetrability, low contractibility and low background. It helps keep the cross-linking between tissues and maintain antigen.
Non-Aldehyde
-
- Carbodiimide, dimethylacetamide, dimethyl-suberimidate, para-benzoquinone are widely used in tissue fixation of peptide hormones.
-
- These fixation agents are better mixed with glutaric dialdehyde or paraformaldehyde.
1.3 Fixation method
Immersion
The immersion method marinates the tissue in fixing solution (at 4℃ if needed) for a specified period which is determined by the antigen stability and type of fixing solution used. Biopsy and surgical specimens as well as other non-irrigation tissues commonly employ this fixation method.
Irrigation
This method has the ability to fix tissues fully and quickly, suppressing the interference of endogenous peroxidase. Therefore, it is a method of choice in animal experiments.
Fixation Time
The fixation time depends on the tissue thickness, solution concentration and experimental temperature. In principle, the time is directly proportional to the tissue thickness but inversely proportional to the solution concentration.
1.4 Tissue Sectioning
Types of tissue section:
(1) Frozen
The most important feature for this type of tissue section is to keep antigen’s immune-competence completely, especially for the cell surface antigen. Both fresh and fixed tissues can be processed as frozen tissues. However, the tissues must be dried (or primary fixed) and stored at low temperature.
(2) Paraffin-Embedded
Paraffin-embedded tissue section is normally sliced by a rotary microtome to give a thickness of 2-7 μm. With proper treatment, the section reveals clear tissue structure and exact antigen location to enable high medical-value pathology researches and retrospective studies. This section type can be stored at 4℃ for long term use.
(3) Cell On Coverslip
- Place settled coverslip in culture bottle or perforated plate
- Take out coverslip after cell growth has reached 60%
- Fix coverslip with cold acetone or 4% paraformaldehyde for 10 to 30min
- Store cell (in gelatin) at -20℃
(4) Cell Smear
- Collect non-adherent cells and wash 2X by cold PBS buffer
- Re-suspend cells with PBS buffer
- Add 30-50 µL to settled slide and smear it evenly
- Air dry slide a little bit and cover cell with 4% paraformaldehyde for 2-4 hours
- Store cell (in gelatin) at -20℃
1.5 Slide preparation
-
- Cool blocks on ice or in a refrigerator at 4 °C and section at a thickness of 4–7 μm (thickness will vary depending on type of tissue, e.g. brain tissue is usually cut thicker compared to other types of tissue) and mount on adhesion treated slides.
-
- Allow freshly cut paraffin sections to dry overnight or for at least several
-
- Place slides in a 60°C oven for at least 2 hours (or overnight ideally).
Deparaffinization and rehydration using standard methods
- Immerse slides in 3 washes of xylene, each for 10 min for a total of 30 minutes (change solutions after they have been used for approximately 30 slides).
-
- Dip slides (approximately 15 dips each) in graded alcohols sequentially from 100%, 100%, 80%, to 70%.
-
- Immerse in two changes of deionized water.
-
- Let sit in deionized water for 5 min (slides can remain in deionized water for up to 30 minutes).
1.6 Antigen retrieval
Antigen retrieval methods include HIAR and enzymatic (protease-induced) which is not further discussed here. HIAR using either a microwave oven or a pressure cooker is a common approach as they typically have a higher success rate for restoring antigenicity than an enzymatic method. We provide sample protocols below of HIAR with a microwave oven or a pressure cooker.
Microwave oven
Place deparaffinized and rehydrated slides in 3% hydrogen peroxide for 5 minutes.
(1)Wash slides with deionized water for 5 minutes.
(2)Place slides in retrieval buffer (such as 10 mM citrate) and heat in the microwave at 100 °C for 5 to 10 minutes. Make sure the buffer level is adequate throughout the heating process.
(3)Cool slides for 15 minutes at room temperature.
(4)Wash slides with deionized water twice.
(5)Wash slides in phosphate buffered saline for 5 minutes.
Pressure cooker
(1)Place removable pan in body of Decloaking chamber.
(2)Add 500mL deionized water to pressure cooker and submerge heat shield, positioning in center of pan.
(3)Ensure gasket properly positioned on the removable pan.
(4)Prepare antigen retrieval buffer.
(5)Fill polypropylene staining dish(es) with prepared antigen retrieval buffer (100mL in each dish).
(6)Place full basket(s) into dish(es) (inserting blank slides into empty slots) and transfer dish(es) into decloaking chamber.
(7)Input settings to Set point according to the manufacturers instruction.
(8)Secure lid on pressure cooker tightly.
(9)After completion, open lid and remove dish(es), and leaving the basket in dish with the retrieval buffer, set the dish on the bench to cool for 20–30 minutes.
(10)Immerse in 2 changes of deionized water and let sit in deionized water for 5 minutes.
(11)Immediately transfer slides to 0.1% TBS-Tween for 5 minutes (can remain in 0.1% TBS-Tween for up to 1 hr).
Blocking endogenous peroxidase
(1)Immerse slides in 3% hydrogen peroxide solution in Coplin jar for 5 minutes (can also use a ready-to-use peroxidase blocking solution).
(2)Rinse in 3 changes of 0.1% TBS-Tween.
Blocking with serum or universal blocking buffer to decrease background staining
(1)Prepare diluted solutions of appropriate antibodies (Note: should spin down the antibodies for approximately 3 seconds in small centrifuge prior to diluting)
(2)Vortex the prepared antibodies for 2 seconds. Place in 4°C until application.
(3)Dry slide around the tissue using a kimwipe and using a hydrophobic pen (e.g. Dako Pap Pen) draw a barrier around the tissue leaving some space between the tissue and barrier.
(4)Each slide should get one quick dip in 0.1% TBS-Tween immediately after pap-penning.
(5)Apply 3–5 drops of blocking buffer to each slide for 15 minutes in trays containing deionized water (close tray as soon as it is applied).
(6)Rinse off blocking buffer with 0.1% TBS-Tween.
1.7 Detection
IHC detection methods vary and are based on the nature of analyze reporting and binding chemistry, among other factors. Three methods are described here: immunofluorescence (IF), Enzymatic and Affinity.
1.8 Immunofluorescence Method
This technique is used for the rapid identification of an antigen by exposing it to known antibodies labeled with the fluorescent dye (i.e., fluorochrome) which produces light when excited by a laser (e.g. argon-ion laser). Specific antibody binding can be determined by the production of characteristic visible light and detected by a fluorescence microscope.
Protocol
-
- Affix the sample on glass slide
-
- Add properly diluted primary antibody to cover the sample
-
- Place the slide into a wet box and incubate at 37℃ for 1-2 hours
-
- Wash the slide 3X with 0.01 M PBS (pH 7.4) for 5 min each
-
- Remove excess water on the sample (but keep it wet)
-
- Cover the sample with properly diluted secondary antibody
-
- Place the slide into a wet box and incubate at 37℃ for 30-60 min
-
- Wash the slide 3X with 0.01 M PBS (pH 7.4) for 5 min each
-
- Remove excess water on the sample (but keep it wet)
-
- Add buffered glycerol (mounting medium) to the sample and mount with coverslip
-
- View the coverslip under fluorescence microscope
1.9 Enzymatic Method
It identifies antigens of interest by exploiting the principle of antibodies binding specifically to antigens. An enzyme label is reacted with a substrate to yield an intensely colored product that can be analyzed.
The enzymatic technique was developed with a similar principle to the IF technique but the two are different as an enzyme is used to label the antibody for the enzymatic method. The labeled antigen forms an antigen-antibody complex where the enzyme catalyzes a substrate to yield an insoluble colored product.
Subsequently, the product can be analyzed by a light microscope or electron microscope. The labeled-enzyme approach can be done by direct or indirect detections.
1.10 Direct Detection
The direct method is a one-step staining method which involves a labeled antibody (e.g. HRP-conjugated antibody) reacting directly with the antigen of interest. The antigen-antibody-HRP complex is then allowed to react with a DAB substrate for staining.
1.11 Indirect Detection
The indirect method is a two-step process which involves an unlabeled primary antibody (first layer) that binds to the target antigen in the sample and an enzyme-labeled secondary antibody (second layer) that reacts with the primary antibody.
The secondary antibody must be raised against the IgG of the animal species in which the primary antibody has been raised. For instance, if the primary antibody is rabbit anti-human IgG, the enzyme labeled secondary antibody could be goat anti-rabbit IgG.
Protocol
-
- Affix the sample on glass slide
-
- Add properly diluted primary antibody to cover the sample
-
- Place the slide into a wet box and incubate at 37℃ for 1-2 hours
-
- Wash the slide 3X with 0.01 M PBS (pH 7.4) for 5 min each
-
- Remove excess water on the sample (but keep it wet)
-
- Cover the sample with properly diluted secondary antibody
-
- Place the slide into a wet box and incubate at 37℃ for 30-60 min
-
- Wash the slide 3X with 0.01 M PBS (pH 7.4) for 5 min each
-
- Remove excess water on the sample (but keep it wet)
-
- Add buffered glycerol (mounting medium) to the sample and mount with coverslip
-
- View the coverslip under fluorescence microscope
1.12 Affinity Method
The IHC sensitivity can be improved by employing a higher number of enzyme molecules bound to the tissue.
In this regard, the multiple binding sites between the avidin and biotinylated antibodies have been exploited for IHC signal amplification. Avidin, an egg white protein, has four binding sites for the low-molecular-weight vitamin biotin to form a large lattice-like complex.
Beside avidin, there are other methods which involve streptavidin which is a tetrameric biotin-binding protein that is isolated from Streptomyces avidinii. The avidin and streptavidin methods work almost identically as their structures are very similar (they have very little amino acid homology). Avidin-Biotin Peroxidase Complex (ABC) and Labeled Streptavidin Binding (LSB) are the two most widely used affinity methods for amplifying the target antigen signal
ABC
-
- Incubation of primary antibody with tissue sample to allow binding to target antigen
-
- Incubation of biotinylated secondary antibody (which has specificity against primary antibody) with tissue sample to allow binding to primary antibody
-
- Pre-incubation of biotinylated enzyme (HRP or AP) with free avidin to form large ABC complexes (Biotinylated enzyme and avidin are mixed together in a pre-determined ratio to prevent avidin saturation)
-
- Incubation of the above pre-incubated solution to tissue sample
LSB
-
- Incubation of primary antibody with tissue sample to allow binding to target antigen
-
- Incubation of biotinylated secondary antibody (which has specificity against primary antibody) with tissue sample to allow binding to primary antibody
-
- Incubation of streptavidin-enzyme conjugate to tissue sample
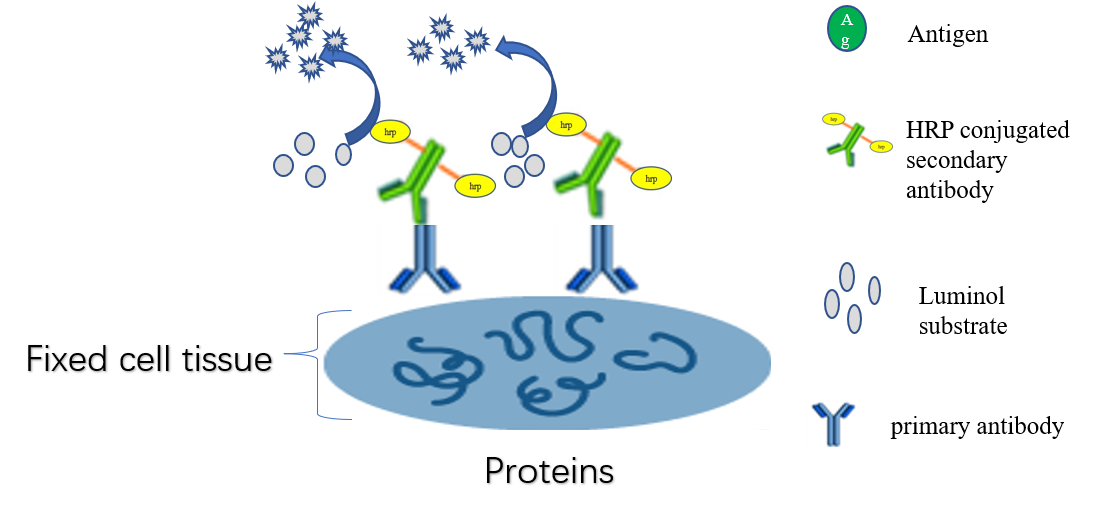
Schematic diagram of Immunohistochemistry (IHC)
1.13 Advantages
-
- Allows for localization and visualization of specific antigens in tissue samples
-
- Provides valuable information about protein expression patterns and cellular localization
-
- Can be performed on a variety of tissue samples, including formalin-fixed paraffin-embedded (FFPE) tissues
-
- High level of specificity and sensitivity for detecting low levels of antigen expression
-
- Can be used to differentiate between different types of cells, especially in cancer diagnosis and treatment
-
- Can be used as a diagnostic tool in clinical pathology to help guide therapy decisions
1.14 Disadvantages
-
- Requires specialized equipment and expertise, which can be costly
-
- Can be challenging to optimize staining conditions for different antibodies and tissue types, leading to variability in results
-
- Non-specific background staining can occur, leading to difficulty in interpreting results
-
- Antigen retrieval techniques may be required for some antibodies, adding an additional step to the staining protocol
-
- IHC is a qualitative technique and does not allow for precise quantification of protein expression levels, unlike other techniques such as Western blotting or ELISA.
-
- False positives and false negatives may occur due to antibody cross-reactivity, epitope masking, or poor antigen preservation
-
- Interpretation of staining results can be subjective and require specialized training and experience.
 Guidence of GeneMedi's protocol / procedure for the diagnostics application: