


GeneMedi's protocol / procedure for the diagnostics application-PETIA
1 Particle enhanced turbidimetric immunoassay
Particle enhanced turbidimetric immunoassay the immunoparticles are prepared by binding the antibodies to the polystyrene particles. The antibodies are absorbed to the surface or covalently bound to a surfactant molecule, such as a methyl-group.
Instead of a radioactive isotope or a coloured substrate to detect the formed immune complexes, the detection technique is based on the change of opaqueness of the solution containing sample, assay buffer and immunoparticles.
This optical change is caused by aggregation of the particles. The antibodies on the polystyrene particles form immune complexes with the antigens present in the sample. Because the antibodies are coated on the whole surface of the immunoparticles, several antigens are bound to the same immunoparticle.
Each of the antigen can react with antibodies attached to other polystyrene particles to form aggregates of immunoparticles bound together by the antigen. The change in optical characteristics is measured by the absorption of monochromatic light through the solution.
Absorption is measured at a point before the reaction starts and at a point after the reaction has declined. The difference in absorption is referred to as the signal. A quantitative measurement of an unknown sample is performed in relation to a calibration curve. A six-point calibration curve is established from six known samples, known as standards with different concentrations. A regression line is calculated using the signal and concentration from each sample.
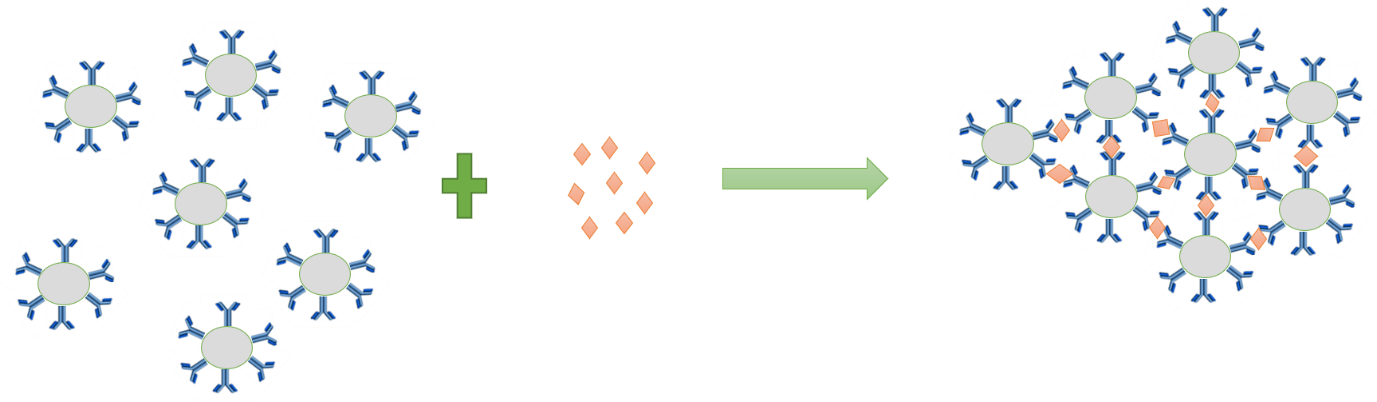
Particle enhanced immunocomplex: Schematic drawing of aggregates of immunoparticles, formed by immune reaction between antibodies conjugated to polystyrene particles and antigen.
1.1 Advantages
- High sensitivity and specificity in detecting specific analytes
- Large dynamic range for detecting a wide range of analyte concentrations
- Short assay time, allowing for high throughput analysis of large numbers of samples
- Simple and cost-effective assay design, requiring minimal specialized equipment and expertise
- No need for washing steps, making it easier to automate and reduce the potential for human error
- Suitable for use in clinical laboratories, as well as other fields such as food safety and environmental testing
1.2 Disadvantages
- PETIA is generally limited to detecting small molecules, such as drugs and hormones, rather than larger biomolecules like proteins or antibodies.
- Some PETIA assays may be prone to interferences from other substances present in the sample, leading to false positive or negative results.
- PETIA is a non-competitive immunoassay and may not provide information on the concentration of the analyte in the sample.
- PETIA may be less sensitive than other immunoassay methods, such as ELISA, especially when detecting low levels of analyte in samples.
- The turbidity of the sample may interfere with the accuracy of the assay, so careful optimization of the assay conditions is necessary.
1.3 Test Procedure/Protocol for PETIA
The specific test procedure for PETIA may vary depending on the target analyte. However, here is a general outline of the steps involved:
- Sample Collection and Preparation: Collect the specimen (e.g., blood, urine, or serum) following appropriate techniques. If necessary, process the sample to remove interfering substances or concentrate the analyte.
- Reagent Preparation: Prepare the necessary reagents provided in the assay kit, such as buffers, diluents, and standards, according to the manufacturer's instructions.
- Sample Incubation: Mix the test samples with the with the appropriate volume (example: 40 μL) of reaction buffer (R1). After a short incubation, add 120 μL of immunoparticle suspension (R2), which contains polystyrene microparticles coated with monoclonal antibodies against the target protein.
- Turbidimetric Measurement: Measure the turbidity of the reaction mixture using a turbidimeter or spectrophotometer at a specific wavelength (572 nm). The change in turbidity is proportional to the concentration of the analyte in the sample.
- Calibration Curve: Prepare a calibration curve using the known concentrations of the analyte (50 to 5000 ng/mL). This will help quantify the concentration of the analyte in the sample.
- Data Analysis: Compare the turbidity measurements of the sample with the calibration curve to determine the analyte concentration. Some assays may require additional calculations or data processing steps.
- Quality Control: Perform appropriate quality control measures to ensure the accuracy and reliability of the results.
 Guidence of GeneMedi's protocol / procedure for the diagnostics application: